Nothing brightens a room better than a vase of fresh blooms. This past weekend I went flower picking at a local farm. For $7 they gave you a bucket and you were free to roam their pastures and stuff as many flowers as you could in the bucket. So beautiful and such a great deal! The amount of flowers I got would total hundreds of dollars at a florist or supermarket. It is a great idea for easy centerpieces for a party or even an inexpensive alternative for wedding flowers!
My Custom TV Console
I have been searching for over a year to find the perfect console to fit below our TV. In our tiny house, this space is the first thing you see as you walk in the front door. I wanted something that could hold a lot of stuff (cable box, books, etc.) and also serve as an entryway piece (a spot to drop your keys and mail). However it needed to be narrow enough that it didn't take up too much walking space. Also, most importantly, it had to be a bargain! The hunt was unsuccessful. Everything I found was either not the right size or too expensive. So my handy man (AKA my fiance Ryan) decided to put his skills and my design ideas to the test. Together we created this masterpiece:
We built the entire thing together. The most important fact that I must add: We never argued throughout the entire process! You know this is unusual if you have tried to build something with a significant other! :)
The piece looks very Mid-century, but I like mixing styles, so I then added super traditional legs. I used a gray stain and finished it in a high gloss. It is exactly what I wanted, and the grand total was $150!
If you are interested in something similar or have your own vision of a piece of furniture, we would love to work with you! Please email gail@gailwrightathome.com
Lunch Time!
Panzanella Salad
Ingredients
- 3 tablespoons good olive oil
- 1 small loaf of good bread, preferably day-old, cut into 1-inch cubes
- 1 teaspoon kosher salt
- 2 large, ripe tomatoes, cut into 1-inch cubes
- 1 cucumber, unpeeled, seeded, and sliced 1/2-inch thick
- 1 red bell pepper, seeded and cut into 1-inch cubes
- 1 yellow bell pepper, seeded and cut into 1-inch cubes
- 1/2 red onion, cut in 1/2 and thinly sliced
- 10 large basil leaves, coarsely chopped
- 3 tablespoons capers, drained (optional)
For the vinaigrette:
- 1 teaspoon finely minced garlic
- 1/2 teaspoon Dijon mustard
- 3 tablespoons of your favorite vinegar
- 1/2 cup good olive oil
- 1/2 teaspoon kosher salt
- 1/4 teaspoon freshly ground black pepper
Directions
Heat the oil in a large saute pan. Add the bread and salt; cook over low to medium heat, tossing frequently, for 10 minutes, or until nicely browned. Add more oil as needed.
For the vinaigrette, whisk all the ingredients together.
In a large bowl, mix the tomatoes, cucumber, red pepper, yellow pepper, red onion, basil, and capers. Add the bread cubes and toss with the vinaigrette. Season liberally with salt and pepper. Serve, or allow the salad to sit for about half an hour for the flavors to blend.
Can You Use Neon in Interior Design?
We know that neon is all the rage when it comes to fashion this summer. The question is: Can you also bring neon into the decor of your home? I think these pics answer the question...ABSOLUTELY!!!
[houzz=http://www.houzz.com/photos/55767/Home-Office-Cabinet-in-Guestroom-in-Sonoma-Residence-modern-home-office-other-metros] [houzz=http://www.houzz.com/photos/23871/High--Low-and-Eccentric---The-New-York-Times---Dining---Wine---Slide-Show---Slid-contemporary-living-room-other-metros]
[houzz=http://www.houzz.com/photos/599724/Colorful-Cottage-eclectic-entry-los-angeles]
[houzz=http://www.houzz.com/photos/1115804/Wooden-Salad-Bowl--Neon-Pink-and-Neon-Yellow-by-Wind---Willow-Home-modern-serveware-]
[houzz=http://www.houzz.com/photos/83388/dining-room-modern-dining-room-other-metros]
[houzz=http://www.houzz.com/photos/818335/Neon-Piper-Pillows-contemporary-pillows-]
[houzz=http://www.houzz.com/photos/96496/Kips-Bay-Showhouse-contemporary-living-room-new-york]
[houzz=http://www.houzz.com/photos/72376/Contemporary-Kitchen-contemporary-kitchen-boston]
[houzz=http://www.houzz.com/photos/888295/Bathroom-contemporary-bathroom-melbourne]
In A Pickle
Our garden is looking great this summer. However, I am now picking about 10 cucumbers a day and can not eat another salad! Our goal this season is to let nothing go to waste, so this past weekend Ryan and I took a stab at making homemade dill pickles.
It turns out it was super simple and a huge success! Here is how we did it:
This recipe made four 16oz. jars
Ingredients for the brine
- 2 cups white vinegar
- 4 cups of water
- 1/2 cup kosher salt
- 1 teaspoon mustard powder
- 1 teaspoon red pepper flakes
- 2 bay leaves
- 1 1/2 teaspoons peppercorns
Pickles
- 6 to 8 cucumbers, cut into 1/2-inch spears or 1/2-inch chips
- 12 sprigs of fresh dill
- 12 cloves garlic
Directions
- Sterilize canning jars on the stove top by boiling in a water bath for 10 minutes. Turn off the heat, and leave jars in the water until you are ready to fill them. Leave water bath on and sterilize the lids the same way.
- While jars are boiling, combine the brine ingredients in a large saucepan. Bring to a rolling boil, then remove from heat and cover to keep hot.
- Remove jars from hot water with tongs, and set on a padded layer of clean towels. Fill the still-hot jars with the cucumbers, and divide the dill and garlic among them.
- Ladle the hot brine into the jars, filling to just below the threading for the lid; this will leave space for expansion during canning.
- Bring the water bath back to a rolling boil, and leave the heat on. Put the lids on the jars, then add rings, and close firmly but not too tight.
- Submerge jars in the boiling water for 10 minutes. Then remove with tongs, and let sit at room temperature for 24 hours so a vacuum seal forms. When the jars are cool, check for a slight indentation in the lid, which indicates a vacuum seal. If any jars did not seal properly, refrigerate and eat within a few days. Properly sealed jars can be stored unopened for up to a year. Refrigerate after opening and eat within a week.
The Garden is Looking Good!
10 Double Duty Furniture Pieces
To earn a place in today's homes, furniture needs to look good and work overtime. These stylish furniture pieces have multiple uses, can be used in many rooms, have smart storage, and clever functionality. We are all busy multitasking, so our furniture should too. The Console Table:
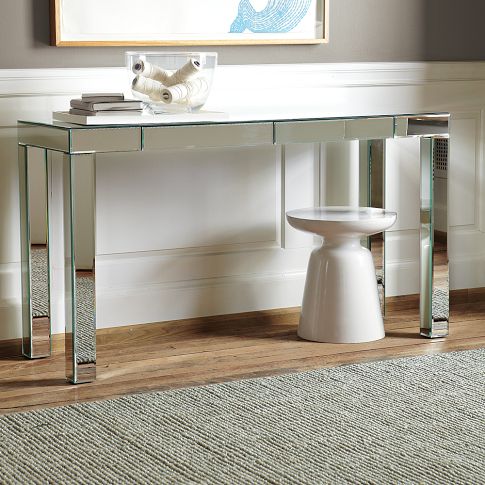
It makes a great desk (with drawers for office supplies) but its overall slim proportions mean this table works in lots of places. You can station it behind a sofa or in a foyer for a place to store keys and the mail.
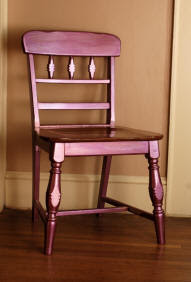
The Upholstered Dining Chair:
It's perfect at the dining table, of course, but also at a desk since those office chairs on wheels are usually not so pretty. Or use it in the bedroom if you want a perch for putting on shoes or pull out into the living room when there's a crowd over watching the game.
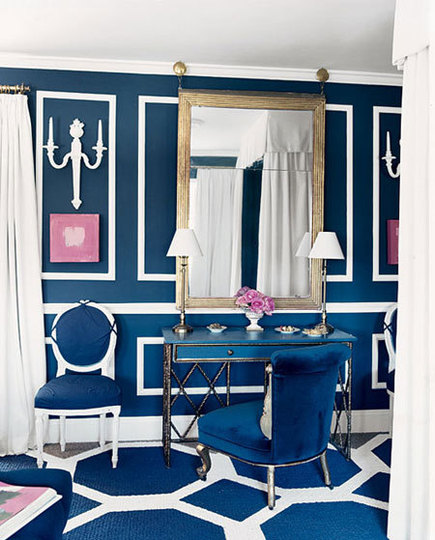
The TV Mirror
This is the solution if you are against having a TV in the bedroom. The frame holds a mid-size flat-screen TV, and when the TV is turned off, it's a mirror. When it's cleverly camouflaged like this, your TV doesn't have to ruin your decor or take up valuable real estate in your bedroom.
Headboard Storage
The shelves roll out from behind the headboard to offer storage solutions on both sides of the bed. Keep the bedroom looking neat and tidy by sliding the drawers into the headboard.
The Storage Ottoman
Instead of shoving a bulky file cabinet in your closet, why not park one of these in your living room? It holds standard-size hanging files and just about anything else you can think of. It also has casters on the bottom, making it easy to move around as well provides extra seating. Choose from more than 100 fabrics for this one.
The Storage Cocktail Table
The top slides open so you can get at what's stored inside without disturbing your tabletop display. Keep remotes and TV accessories in the top compartment and board games in the bottom drawer. Or try it at the foot of the bed for sweaters because it is also cedar-lined.
The Storage Cube
These come in six different colors. At 18 inches, they're perfect next to a sofa or chair. Pull four together for a generous coffee table, or stack them into sleek, streamlined towers for showing off your stuff. The simple design and glass top goes with any decorating style.
The Sleeper Sofa
The futon grows up and gets better-looking. This sofa pulls out to become a full-size bed. There are also seven colors of slip covers to choose from. But the coolest part is that the arms zip open to store pillows and bedding, so you're always ready for an overnight guest.
The Dining Table with Storage
If you're one of those people who uses the dining table as a desk, this one's for you. The tabletop slides open to reveal two storage cubbies with dividers. Use one for office supplies and the other for silverware, napkins, and rings. The table's clean lines mean you can pair it with any style of chair.
The Wedge Ottoman
Each person takes a slice of the pie to sit on. Or put them all together and add a big tray for a coffee table that's super practical, especially if it's upholstered in leather or outdoor fabric.
Designer DIY
I look forward to my House Beautiful issue in the mail every month. It is one of my many sources where I find inspiration for my projects. As I was reading this June's issue as usual, dog-earring pages of good ideas and great design. Then I discovered something very interesting about one of the feature homes.
It starts with the room pictured on the cover. Although it may look like all the other gorgeous homes featured on House Beautiful's covers, this one is a little different.
The home belongs to the editor of Kansas City Spaces magazine, Zim Loy. One quick flip through the spread of her home and you would think it was just another beautiful home filled with expensive, designer home goods. Once I read the article, that wasn't the case. Not only does she do most of the work (painting all of the rooms and furniture herself) but she does an amazing job creating a high-end designer look, for much less.
She scourers estate sales for old, beat up furniture and turns them into modern masterpieces.:
Other tricks up her sleeve included a sheep skin rug from Costco under the master bed, bedside tables that were former department store displays, hand sewn bleached linen curtains, and a beautiful silver leafed sideboard.
Just another example that you don't have to spend a fortune for a fabulous home!
All photos courtesy of www.housebeautiful.com
Ginger Lime Melon Salad
I made this for a Memorial Day party last week and it was a hit. I stole the recipe from The Chew's Clinton Kelly. It was so amazing I made it again this week and added some watermelon. You can use any fruit you have on hand. Many have asked for the recipe so here it is: Ginger Fruit Salad
For the Fruit Salad:
- 2 cups Pineapple (cubed or balled)
- 4 Kiwi (peeled and sliced into rounds)
- 2 cups Cantaloupe (cubed or balled)
- 2 cups Honeydew Melon (cubed or balled)
- Zest and Juice of 2 Limes
- 1/2 cup Mint Leaves (torn)
- 1/4 cup Ginger Simple Syrup - below
For the Ginger Simple Syrup:
- 1 cup Sugar
- 1 cup Water
- 1 large piece Ginger (peeled and sliced into thin rounds)
For the Fruit Salad: Toss all the fruit together, and add the lime juice, lime zest, mint, and 1/4 cup of ginger simple syrup. Allow to sit a few minutes to allow the flavors to brighten.
For the Ginger Simple Syrup: Bring the sugar and water to a boil in a saucepan over medium-high heat until sugar dissolves. Add ginger and bring to a simmer. Remove from heat, and let steep for 1 hour. Pour syrup through a sieve into an airtight container and discard ginger. Refrigerate between uses.
Easy Weekend Makeovers
Spring has sprung and it is time to tackle those to-do lists around the house. It is also the perfect time to freshen up the inside of your home. Every weekend I try to complete at least one project on my long list of home improvements. Here are some easy, do-it-yourself projects that can change your home decor and your entire look in just a day!
Paint or Wallpaper an Accent Wall
You can be a little bolder with your color and pattern choice when you are only covering one wall
Add Architectural Detail with Moldings
This is a simple, inexpensive project that adds a lot of bang for your buck. This update can add significant visual impact and detail to a room. Crown molding gives the optical illusion of greater height and makes the room design feel more complete.
Install a Tile Backsplash
Add color and texture to your kitchen with a mosaic tile backsplash. With new materials on the market, it's possible to set and grout tile in just one day. There are an endless amount of different colors and materials in every price range. I installed my kitchen backsplash myself (the first picture below), so I am sure you can too!!
Give Old Furniture New Style
Any piece of furniture can get a big style boost with a can of spray paint and bit of creativity.
![]() |
BEFORE |
![]() |
AFTER |
This latter was turned into a colorful shelf using paint and old vent grates screwed onto the steps
Get Organized with a Message Center
An information center on the inside of a kitchen cabinet keeps track of schedules, grocery lists, coupons, keys, and other small items.
How to make it: Cover the back side of a cabinet door with chalkboard paint or apply peel-and-stick chalkboard. Screw pegboard over another panel and store small items from hooks.
Paint Your Front Door an Unexpected Color
Crate and Barrel Copy Cat
My best friend just moved into a new home and we always have a blast shopping for things to fill it with. On a routine stroll through Crate and Barrel we came across this little navy side table that was perfect for her living room.
That perfection came to the tune of $300 for the tiny table. I instantly took a picture of it and sent it to Ryan. The table was simple and had such clean lines, I knew we could make this for a fraction of the cost.
Here are the results:
[slideshow]
If you are intersted in having one of this custom made in your choice of color please visit my store: http://www.etsy.com/shop/GailWrightatHome
What's for Dinner
This was dinner last night. It is a quick, healthy, and delicious pasta that is a favorite in my household. I make it year round, but add whatever veggies are in season. The asparagus is the perfect spring addition to this dish! Pesto Pasta with Asparagus and Roasted Red Peppers
Ingredients:
1 lb. of your favorite pasta
1 bunch of asparagus, cut into 1-2 inch pieces
1 jar of roasted red peppers, drained and chopped
1/4 cup pine nuts or walnuts
3 cloves of garlic
4 cups fresh basil leaves
1 teaspoon kosher salt
1 teaspoon freshly ground black pepper
1/2 - 3/4 cups good olive oil
1/2 cup freshly grated Parmesan
Cook the pasta according to instructions on the package. Add the chopped asparagus to the boiling pasta during the last 5 minutes of cooking time.
Meanwhile, place the nuts and garlic in the food processor and process for 30 seconds. Add the basil leaves, salt, and pepper and pulse until combined. With the processor running, slowly pour the olive oil into the bowl through the feed tube and process until the pesto is thoroughly pureed. Add the Parmesan and pulse until combined.
Drain the pasta and asparagus, reserving about 1 cup of the cooking water. In a large serving bowl, add the pasta, asparagus, pesto, and roasted red peppers. Toss with the pasta water, adding a little at a time until the pesto becomes saucy.
Serve with more freshly grated Parmesan cheese.
New Uses for Old Wine Bottles
I friend of mine asked if I had any ideas on what to do with old wine bottles, here are I few of my favorite ideas that I came across...
1. Of course there is the obvious. Old wine bottles make great vases for long stem flowers. If you have access to a glass cutter, you can get a little more creative with the angles, like these vases.
East to follow instructions on how to do this can be found at: http://green.thefuntimesguide.com/2009/12/diy_wine_bottle_vases.php
2. Make some really good home-made salad dressing. Thoroughly clean out a wine bottle and pour it in the bottle. It makes for a really nice decanter for your dressing . You can also give them away as gifts.
3. Fill old bottles with hand soap, dishwashing liquid, or bath bubbles. Then attach a pump to the top of the bottle. The pumps can be found at most hardware stores. It is much prettier than the plastic bottles sitting on the sink.
4. I thought these Tiki torches looked pretty cool. Instructions for this project are at the following site: http://green.thefuntimesguide.com/2009/08/wine_bottle_diy_ideas.php
5. You can paint wine bottles with glass paint and get a creative as you want.
6. Some wine bottles have interesting and beautiful shapes. To make them look a little more modern, I would group 3 bottles together that are different shapes and sizes and paint them all the same color. You always want to group similar items in odd numbers. Here are two examples:
7. If you are feeling really industrious, you can build your own wine bottle chandelier. This one from Pottery Barn cost over $400!!!
You can make your own for much less. Here are step by step instructions to make this similar one: http://www.oregonlive.com/hg/index.ssf/2008/06/_i_chose_to_use.html
Painting Old, Outdated Furniture
When it's artfully applied, paint adds more than color. It alters the very nature of the piece, often evoking another time and style. You can wake up a tired piece of furniture by giving the legs a glossy enamel finish. It will look like it came right out of a new showroom. Or you can reverse the age of a piece of furniture. A contemporary table that has been refinished can acquire the look of an antique in hours, not years. Choose a piece of furniture -- perhaps a desk you spotted at a flea market or a chair you've grown tired of -- then get to work. You'll need nothing more than basic painting skills, a handful of materials and these steps:
Step 1: Sand
Sand the piece to rough up the surface, which will help to make the paint adhere. Thoroughly brush off the dust (I go over it with the brush attachment of the vacuum cleaner) Then go over it again with a soft cloth to pick up any of the finer particles left behind.
Step 2: Apply Primer
Apply a quality primer to the furniture. I learned the hard way and didn't use quality products the first time around and it NEVER dried. Let the primer dry completely, overnight is best.
Primer must match the type of paint you have chosen. For furniture it's best to use a satin or semigloss finish in either a latex or an oil-based paint. Although I suggest latex. It goes on easily and blocks most stains, but it doesn't have the odor of an oil-based primer.
Step 3: Paint
When you're painting, start at the top and work down, smoothing paint drips as you work downward. You can use a brush or a roller, depending on the size of the surface area. Paint the first coat and allow it to dry overnight, then add another coat the next day and let that dry completely before moving the piece. Darker paint colors may require 3 or 4 coats.
Step 4: Add New Hardware
This is easy, inexpensive, and makes a major difference in the look of a particular piece. Some of my favorites can be found at www.anthropologie.com and http://www.jvjhardware.com/
Step 5: Get Creative!
There are so many options. Any craft or home improvement store has millions of unique products you can use. There is silver/gold leaf, wood stains of any color, metallic paint, faux finishes, you name it. Don't be afraid to get a little creative and do something outside the box. You can always alter the finished product if you really hate the end result. Here are some pics to give you some inspiration and get your creative juices flowing...
Decorating a Rental
There are many people who rent and do not own their homes. This may limit you on what you can and cannot do when it comes to decorating. Most property owners won’t let you paint walls or cabinetry, put in new flooring or make any permanent changes. You have to use a little more creativity, but it can be done. Use your imagination and you can turn the space into a comfy home. Here are a few ideas to get you started:
Area Rugs:
Use area rugs to cover unsightly, dingy carpet and add lots of color to the room. Or you can even hang a large rug to add color to the walls
Slip covers:
A lot of times when renting a home or apartment, it comes furnished or you have hand-me-down furniture from family. Slip covers are an excellent way to turn Grandma’s floral print sofa into a clean and contemporary lounge spot. Now covers come in every size, color, and pattern. They are also easy to clean since most of them can be thrown into the washer. http://www.target.com/ has many different inexpensive slip covers in various colors and fabrics.
Repurposing old furniture: If you have old acquired pieces of furniture, try painting it. You can paint old picture frames, chairs, tables, lamps, bookcases, you name it. Just sand it down, and spray paint. An antique lamp can look brand new and very modern painted bright green.
Throw on a new lamp shade and you have a cool new accessory.
Shower head:
To make the bathroom more spa-like, replace the existing shower head with a new one like this rainfall shower head with detachable hose for only $29.99 at http://www.homedepot.com/
Window coverings: Don’t forget about the windows! Adding curtains to a window is inexpensive and can instantly make the room fell more like home.
Dress Up Your Bed:
Add lot of color with pillows and throws. If you are feeling crafty, you can even make your own headboard to lean against the wall behind your bed. All you need if some wood, foam padding, and fabric.
Most renters can't paint the walls, so add color in creative ways:
Pick up a collection of dollar store frames, spray paint them black, then frame unusual things such as pretty pieces of fabric, cd covers, your own artwork, shells, anything! Pick something you love and display them as a grouping on the wall.
Make one focal wall by covering it with fabric or hang a wall mural. This will add a lot of drama and color, but is a snap to take down when you move. You can also use the same idea in the kitchen. Cover cabinet doors with fabric and attach with Velcro on the back
Make it Personal:
Add your own personal touches. Photos of family and friends, keepsakes, whatever makes you feel comfortable and at home. With just a little creativity you can use your rental to express yourself.
I'M BACK!
Hello All!
I know it has been a very long time since I have updated this site. I have been doing a lot of researching and experimenting, trying to figure out exactly where I wanted to go with this "Gail Wright at Home" dream that I have. I have been very busy working in the design world, meeting many new clients, and helping them make their houses into homes along the way.
However I have missed talking about design as well as my second obsession - FOOD! So I am back in the blogging world and promise to update much more frequently.
I have lots of dreams and ideas, including one day having a brand of my own. In the meantime while I get my ideas up and running, I want you to follow me on this journey. I will continue to post updates on what I am up to in my day-to-day activities, as well as share my favorites in food, design and whatever else is happening in my world!
Here we go....